Blog
How to Offload WordPress Media to Improve Website Speed
Does your WordPress website have a lot of images and videos? These files can make your content look great, but they can also slow your website down and frustrate your visitors.
One of the ways you can tackle this issue is by offloading your WordPress media files.
This involves storing your media files on a separate server. This frees up resources on your main web server and allows your website to load faster.
For example, you could offload media files to Cloudflare CDN to make your site faster for users worldwide. Alternatively, you can store your media files on fast cloud storage like Amazon S3 or Google Cloud Storage.
This article will show you how to offload WordPress media using different methods so you can choose the best approach to improve your website speed.
How Offloading WordPress Media Improves Website Speed
Offloading WordPress media involves storing large files on external servers rather than your website’s hosting server. These can include images, videos, and audio files. Plus, software downloads, PDFs, documents, and even animations can be offloaded.
This is a great way to lighten your website’s server load.
When someone visits your site, your web server no longer needs to load your media files. This frees up resources so it can focus on other important tasks, like loading your website’s code and content faster. That means faster page load times and a better overall website experience.
One way to do this is to store your media on a cloud storage service like Amazon S3 or Google Cloud Storage. Then, you can use a plugin to integrate that service with your WordPress site.
You can achieve similar speed gains using a Content Delivery Network, or CDN, instead. This stores copies of your media files on multiple servers around the world to lighten your server’s load and improve WordPress performance.
For large video files, consider using a video streaming platform like YouTube or Vimeo and embedding the videos on your website. This further reduces your web server’s load and storage requirements and provides a better viewing experience for users.
Now, offloading WordPress media is just one way to improve your site’s performance. Make sure you combine it with other strategies like choosing fast hosting and performing regular WordPress maintenance to achieve the best website speed and user experience.
With that being said, let’s take a look at a few ways you can offload WordPress media to improve website speed:
Offload WordPress Media Using WP Offload Media (Free)
WP Offload Media is a popular and free WordPress cloud storage plugin that automatically copies your images, videos, documents, and other media to your cloud storage provider of choice.
The plugin currently works with Amazon S3, Google Cloud Storage, and DigitalOcean Spaces for cloud storage. You will need to carefully create and configure your cloud storage account and install, activate, and set up the plugin.
Setting Up Your Cloud Storage Account
If you don’t already have an existing cloud storage service, then your first job is to choose one and sign up for an account.
The WP Offload Media website offers helpful documentation on how to get started using the different cloud storage options. For this tutorial, we will show you how to offload your WordPress media files to Amazon S3 cloud storage.
You can sign up for a free account at the Amazon Web Services website. While the account is free, you will need to enter credit card details when setting it up.
Alternatively, if you already have an account, then simply click the ‘Sign in to an existing AWS account’ button and enter your login information.
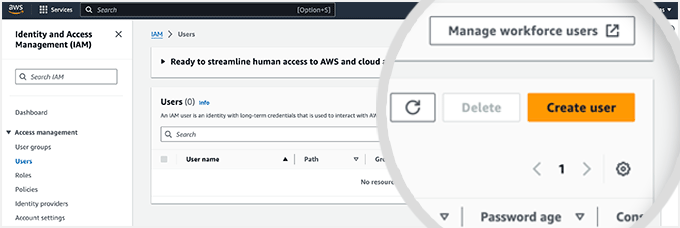
Next, you will need to set up a User to obtain access keys. You need to open the Amazon Web Services Users page and then click the ‘Create user’ button.
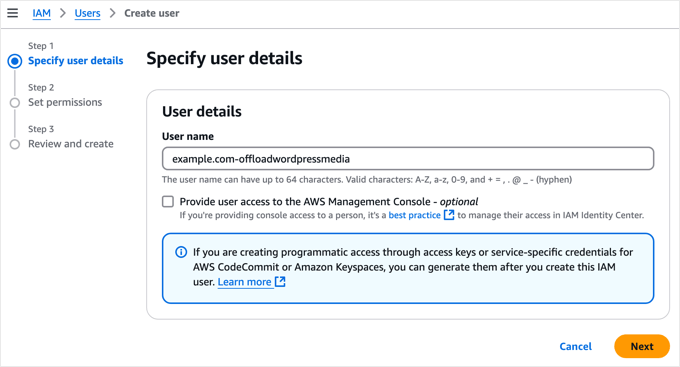
On the next screen, you can specify the user details. Add a name in the User field. We recommend you use the format yourdomain-offloadwordpressmedia.
The benefit is that if you create additional users for other websites in the future, then this username will help you see the website the account is for, as well as its purpose.
Make sure you do not check the ‘Provide user access to the AWS Management Console’ box, and then click the ‘Next’ button to continue.
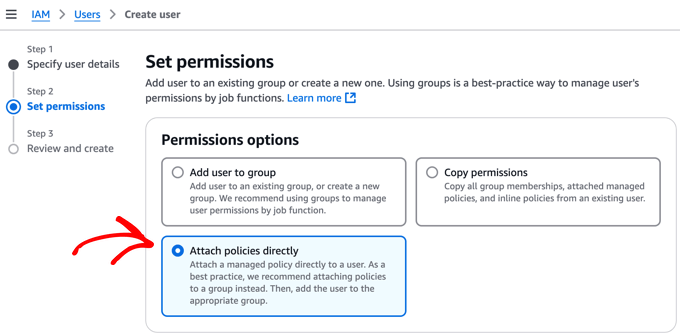
Next, you need to give this new user permission to access Amazon S3 storage and offload your WordPress media files.
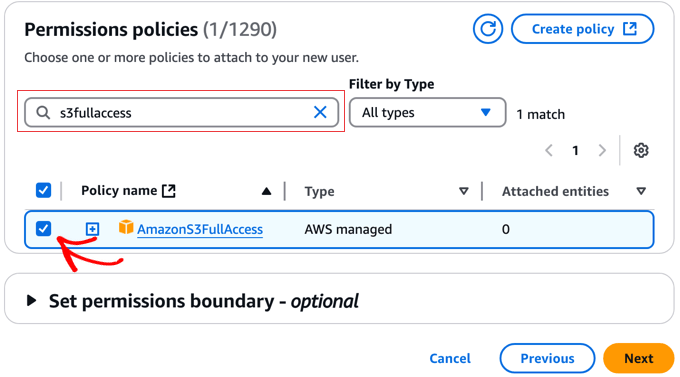
At the top of the page, select the ‘Attach policies directly’ option. This will display a list of permissions policies that you can individually select.
Now, you can filter the list of policies by typing ’s3fullaccess’ into the search box.
This will let you easily check the ‘AmazonS3FullAccess’ policy name. Once you have done that, simply click the ‘Next’ button to continue.
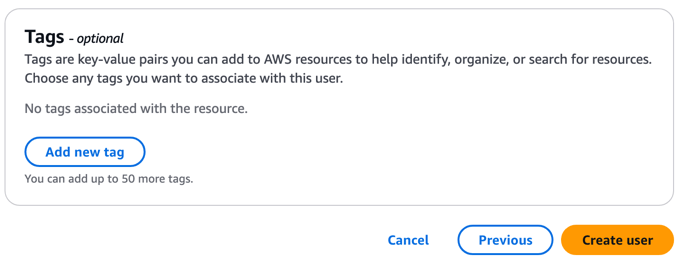
The next page will let you add optional tags. This is not needed for most websites. However, if you have set up a lot of AWS users already, then you may have already created a tag system to manage them.
Now, you can simply click the ‘Create user’ button to finish creating the new user.
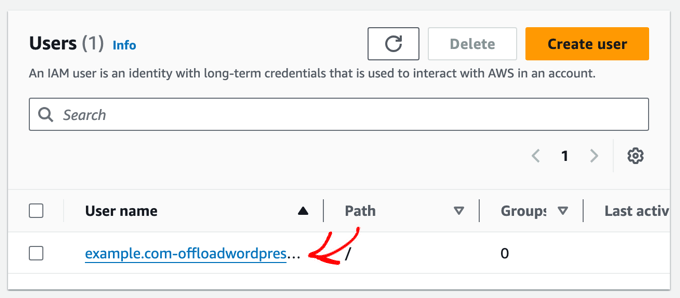
Next, you need to create access keys for the new user.
To get started, simply click on the new user name.
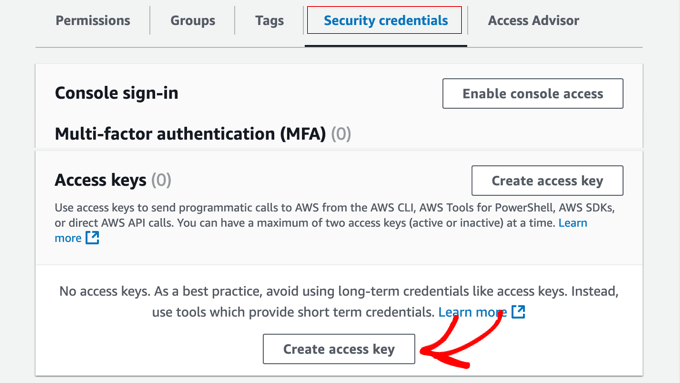
Now, you need to click on the ‘Security credentials’ tab and scroll down to the ‘Access keys’ section of the page.
Once there, you need to click the ‘Create access key’ button.
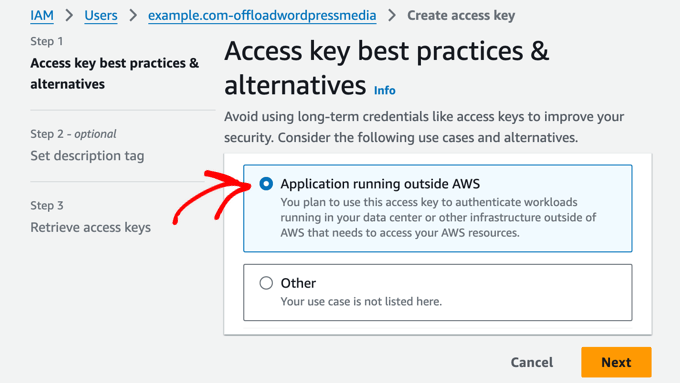
This will open the ‘Access key best practices & alternatives’ page.
Simply click the ‘Application running outside AWS’ option and then click the ‘Next’ button.
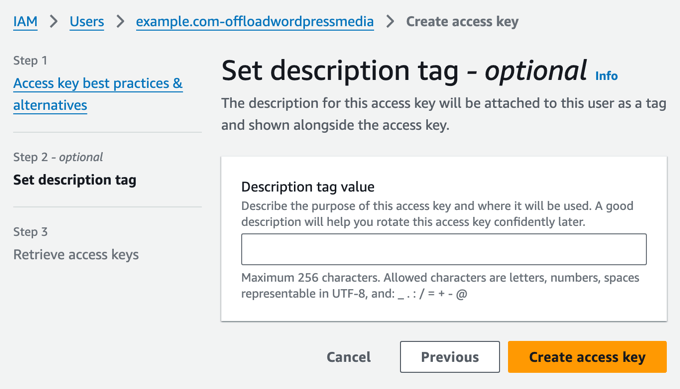
The next page allows you to set an optional description tag. For this tutorial, we will leave this field blank.
When you are done, click the ‘Create access key’ button.
You will see the security credentials for the user. These consist of an Access Key ID and a Secret Access Key.
Amazon will not show these again, so you should immediately download the .csv file and store it somewhere safe.
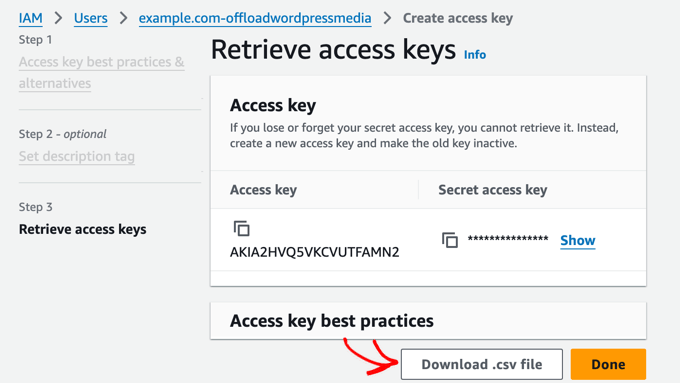
Note: It is important to store your access keys carefully. If you lose them, then you will need to go through the steps above again to create a new one.
Now, you will need to add your AWS access keys to your WordPress site so that the WP Offload Media plugin can use them to offload your media files to Amazon S3 storage.
The most secure way to do that is to add them to your WordPress wp-config.php file. To learn how to modify this file safely, see our guide on how to edit wp-config.php in WordPress.
Now, you need to copy the following code snippet:
define( 'AS3CF_SETTINGS', serialize( array(
	    'provider' => 'aws',
	    'access-key-id' => '********************',
	    'secret-access-key' => '**************************************',
	) ) );
This needs to be pasted into your wp-config.php file.
Make sure you copy the code snippet between the two lines below, or WP Offload Media will not be able to read it.
/* Add any custom values between this line and the "stop editing" line. */


/* That's all, stop editing! Happy publishing. */
Finally, you need to replace the asterisks with the access key ID and secret access key found in the .csv file you downloaded earlier.

Don’t forget to save the wp-config.php file to store your settings.
Installing the WP Offload Media Plugin
The next step is to install and activate the free WP Offload Media Lite plugin. If you need help, then please see our beginner’s guide on how to install a WordPress plugin.
Upon activation, you need to navigate to the Settings » WP Offline Media page in your WordPress dashboard to configure the plugin.
Make sure you select the ‘Create New Bucket’ option and give the bucket a name, such as media.example.com. You can also select the region in the world that is closest to most of your WordPress visitors.
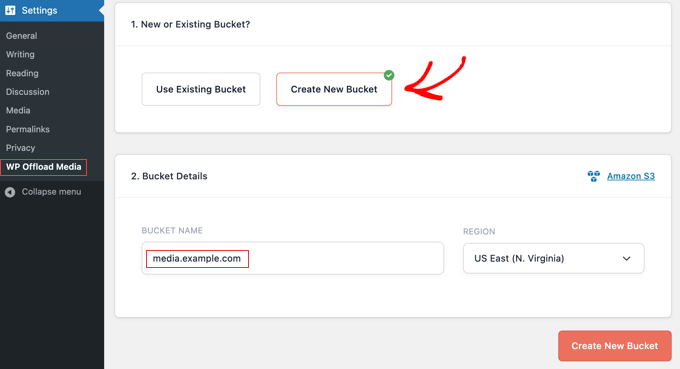
Once you’ve done that, click on the ‘Create New Bucket’ button at the bottom of the screen.
Congratulations, WP Offload Media is now set up to offload newly uploaded media to the Amazon S3 cloud storage bucket using the recommended settings.
If you want your existing media files to also be offloaded, then you will find an option to do that in the paid version of the plugin.
Offload WordPress Media Using WP Media Folder (Premium)
WP Media Folder is a premium plugin that helps you manage and organize the WordPress media library and sync with external cloud storage services.
It integrates with cloud storage services like Google Drive and OneDrive using the WP Media Folder Cloud addon. This will give you an option in your WordPress Media Library to upload certain files to the cloud storage service rather than your web server.
WP Media Folders is a good choice if you need to organize your media files into folders or create custom image galleries. It is also easier to set up than some of the other methods.
We thoroughly tested this plugin and found it to be a great solution for WordPress blogs with a lot of media files, such as photography portfolios and digital artwork stores. You learn more in our detailed WP Media Folder review.
In this tutorial, we will take a look at how to offload WordPress media to Google Drive using the WP Media Folder plugin.
Installing the WP Media Folder Plugin
First, you need to purchase the WP Media Folder plugin. As part of this process, you will need to create a JoomUnited account. Make a note of the username and password you created because you will need them later in this tutorial.
Now, you should install and activate the WP Media Folder plugin. For more details, see our step-by-step guide on how to install a WordPress plugin.
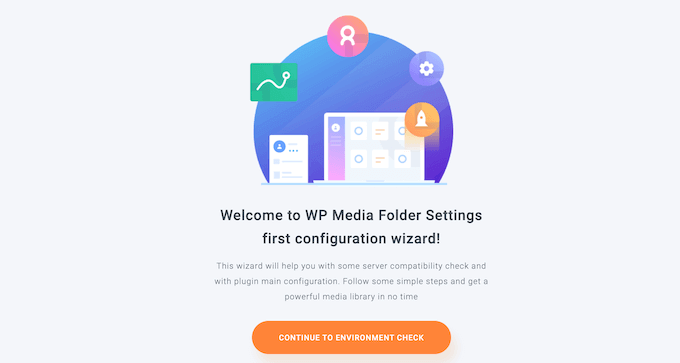
Upon activation, the setup wizard will start automatically. To get started, click the ‘Continue to environment check’ button.
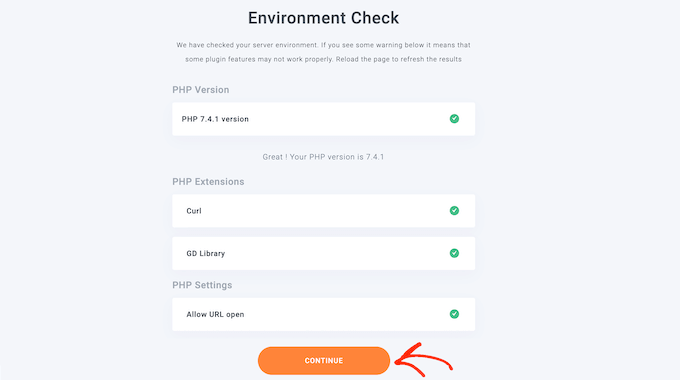
WP Media Folder will spend a few minutes checking your WordPress environment, including your PHP version, extensions, and settings, to make sure the plugin will work correctly.
If each item has a green checkmark, then you can simply click the ‘Continue’ button to move the wizard to the next step. Otherwise, you should contact your hosting provider and ask them to address any issues.
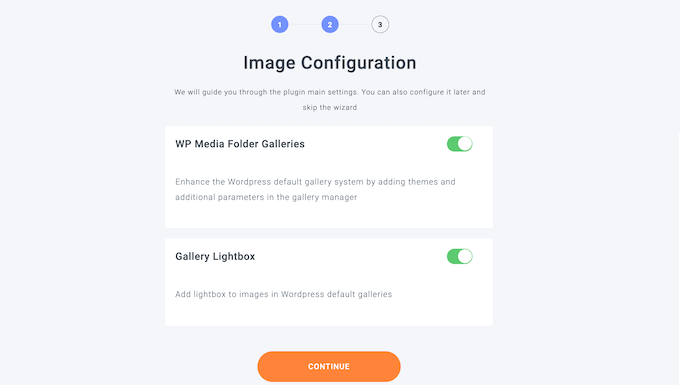
On the next page, you can choose whether to use WP Media Folder’s gallery and lightbox features. These features let you create, edit, and delete folders from inside the WordPress Media Library.
This is useful for most websites, so we recommend leaving these options enabled and then clicking the ‘Continue’ button.
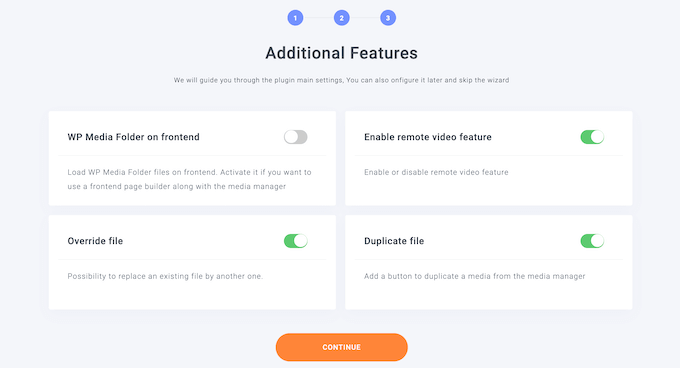
The next step lists some additional WP Media Folder features.
The default settings work well for most WordPress websites. Toggle on any additional features you would like to use, and then click the ‘Continue’ button.
After waiting a few moments, you will see a success message.
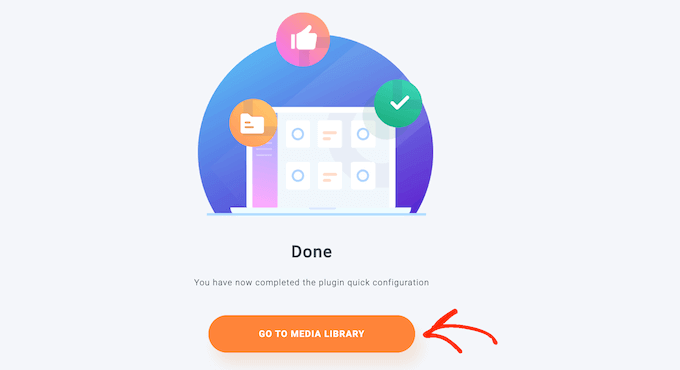
You can finish the setup wizard by clicking the ‘Go to Media Library’ button.
Installing the WP Media Folder Cloud Addon
Now, to offload your media files to Google Drive, you need to install and activate the WP Media Folder Cloud addon. You can do this the same way you install a WordPress plugin.
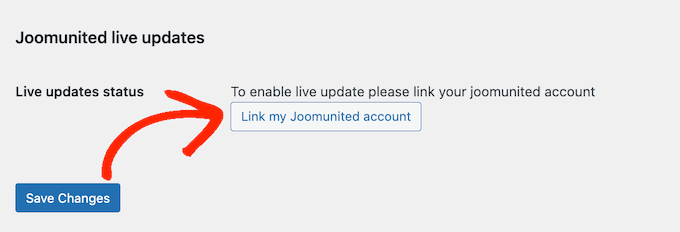
Next, head over to Settings » General to connect Google Drive to your WordPress media library. Simply scroll to the ‘Joomunited live updates’ section and click ‘Link my Joomunited account.’
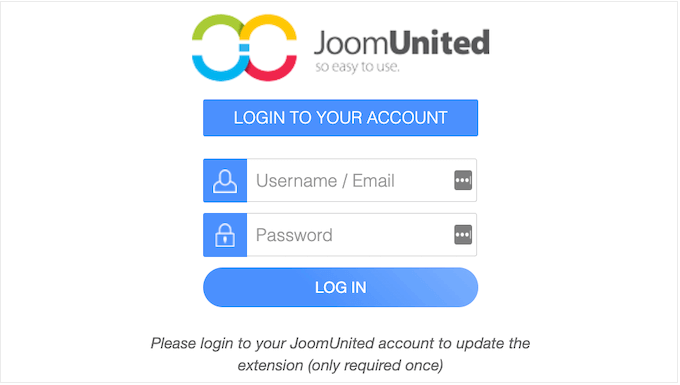
In the popup that appears, type in your JoomUnited username and password and then click ‘Log In’.
Remember that this is the email address and password you used when you purchased the WP Media Folder plugin earlier.
Now, you are ready to connect Google Drive to your website so you can offload your WordPress media files.
Simply go to Settings » WP Media Folder to get started.
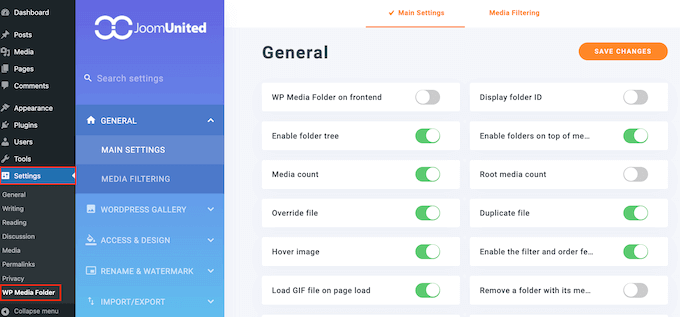
Using the menu in the left pane, navigate to Cloud » Google Drive.
You need to select the ‘Automatic’ option for connecting to Google Drive, and then click the ‘Connect Google Drive’ button at the top right of the screen. You will be asked to log in to the Google account you wish to use.
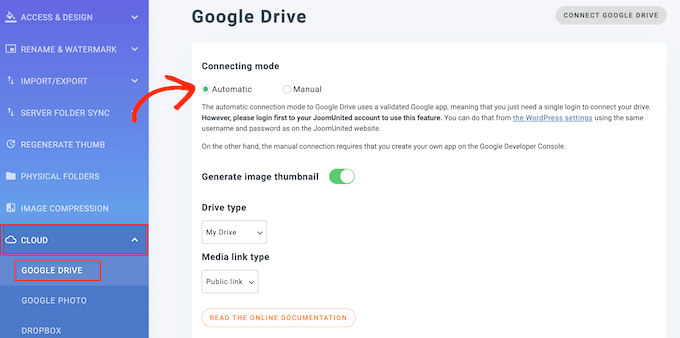
Congratulations, Google Drive is now connected to your WordPress website. While your WordPress media library files remain on your web server, you can easily access Google Drive from there as a second location for storing media files.
When you add media files from Google Drive to your posts and pages, they will be served from Google Drive, freeing up server resources and improving your WordPress performance.
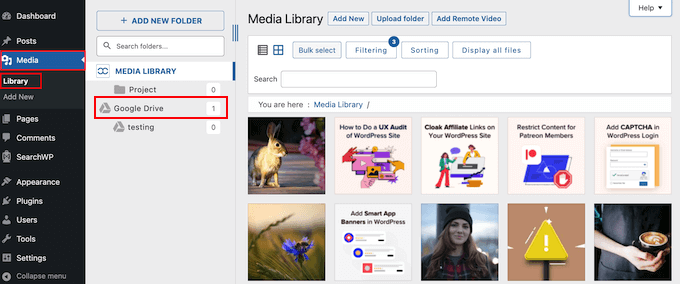
You can learn how to do this, as well as how to use WP Media Folder to organize your Google Drive images, in our guide on how to connect Google Drive to your WordPress media library.
Offload WordPress Videos Using a Streaming Service
In our experience, videos take up a lot of storage space and bandwidth. This makes storing videos in WordPress or cloud storage expensive and slow.
That’s why we always recommend that you don’t upload videos to your WordPress Media Library but instead use a video streaming service that is optimized for letting people watch video content online.
When you upload a video to streaming services like YouTube or Vimeo, they process each video for a better web experience. Then, viewers can choose to watch your video in HD or on lower resolutions to use less data.
These video services even detect a user’s device and internet connection automatically and play the video in the best quality for each user.
Once the video has been uploaded to the streaming service, you can easily embed it in WordPress so your visitors can view it on your website.
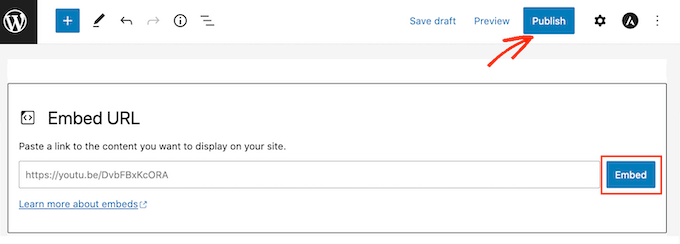
Plus, other users who are not even aware of your website may discover your video on the streaming service. This can bring more traffic to your website.
For example, our own WPBeginner YouTube channel has over 1 million subscribers and gets tens of thousands of new views each week.
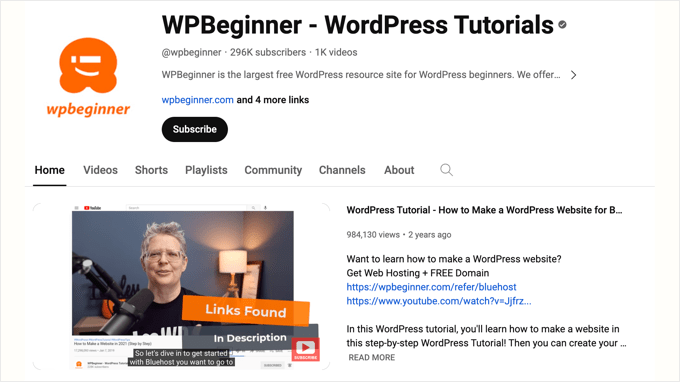
For more on this subject, see our guide on why you should never upload a video to WordPress.
Offload WordPress Media Using Cloudflare CDN
Another way to offload your WordPress media files is by using a Content Delivery Network or CDN. This is the method we use at WPBeginner.
CDNs store a copy of your website’s media files across a network of global servers. When a user visits your site, the CDN serves the media from the server closest to them, improving load times.
This solution works well for us at WPBeginner because we have readers located all around the world. We use Cloudflare as our CDN, but there are plenty of other quality WordPress CDN services to choose from.
Creating a Cloudflare Account
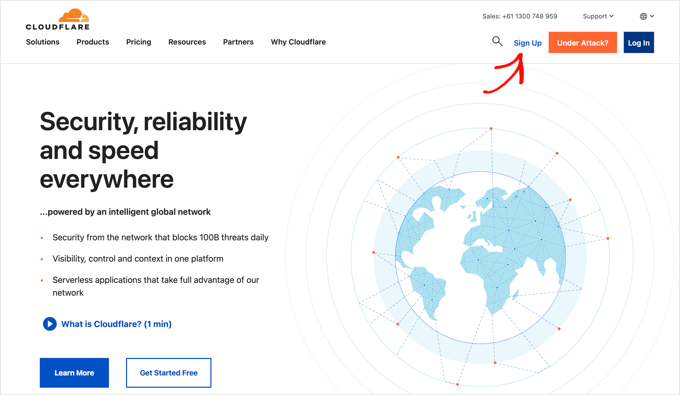
To get started, you need to visit the Cloudflare website and simply click the ‘Sign Up’ button.
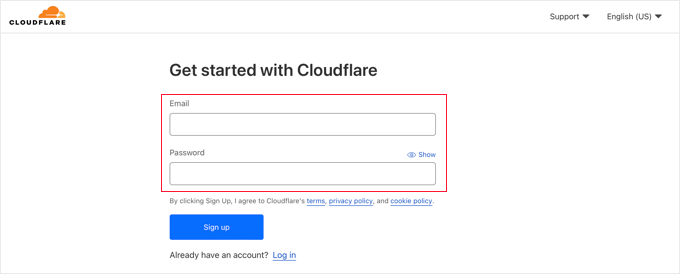
This will open a new page where you can create a Cloudflare account by entering your email address and choosing a password.
Once you enter that information, click the ‘Sign up’ button to continue.
Once you have done this, you will see the ‘Thank you for choosing Cloudflare’ message confirming that your account has been set up successfully.
You can now add your website to Cloudflare by clicking the button labeled ‘Add a website or application’.

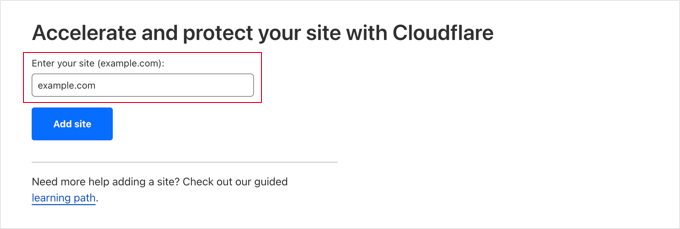
On the next page, you can type your website in the ‘Enter your site’ field.
You don’t need to enter any extra characters, just your site’s domain name, like example.com.
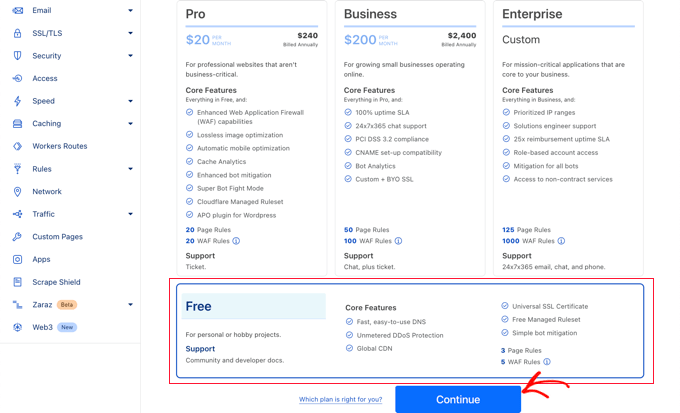
The next screen lists the different plans that Cloudflare offers. After selecting a plan, click the ‘Continue’ button.
We’ll use the free plan for this tutorial.
Now, Cloudflare will list your website’s DNS records. You need to choose which of these should be passed through Cloudflare to improve your site’s performance.
Make sure you toggle your primary domain, such as example.com, so that it is active and shows an orange cloud.
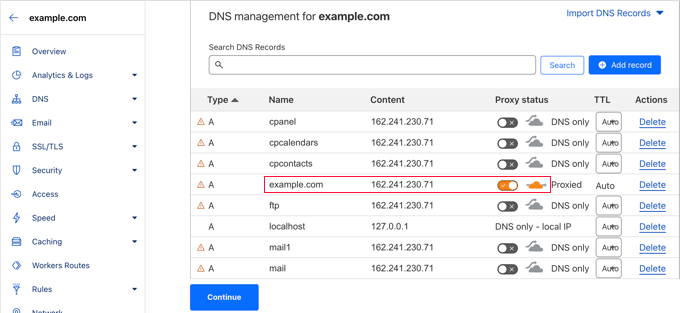
Once you have activated the DNS records you wish to pass through Cloudflare, make sure you click the ‘Continue’ button at the bottom.
Updating Your Website’s Nameservers
Now, in the next step, Cloudflare will let you know that you will need to update your nameservers.
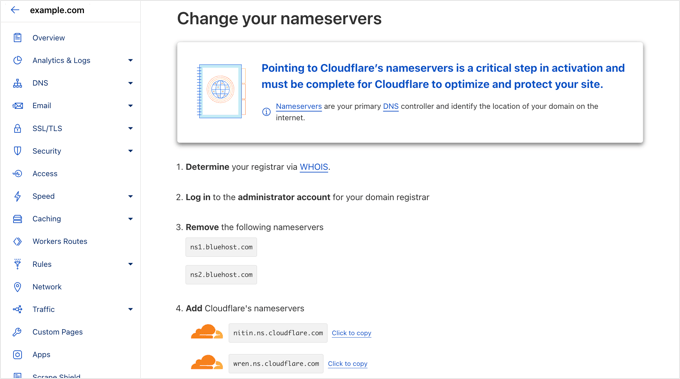
You can do that by visiting your domain registrar account, like Domain.com. Or, if you were provided a free domain by Bluehost or another web hosting provider, then you will need to log in to your hosting account.
Let’s go step-by-step through how to do this with Bluehost. If you are using a different hosting provider or domain registrar, the steps will be similar, and you can reach out to them for help or look at their online documentation.
You need to log in to your Bluehost account and then go to the ‘Domains’ section of their dashboard. Next, click the ‘Settings’ button next to your domain name.

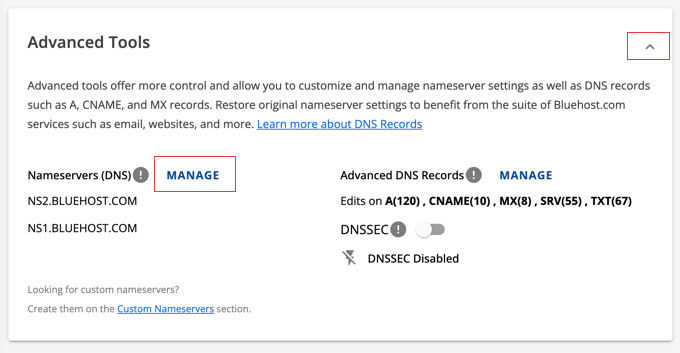
On the next page, scroll down to ‘Advanced Tools’ and expand the section by clicking the arrow on the right of the screen. You will see your website’s DNS settings, including the nameservers.
Now you should click the ‘Manage’ button next to ‘Nameservers (DNS)’.
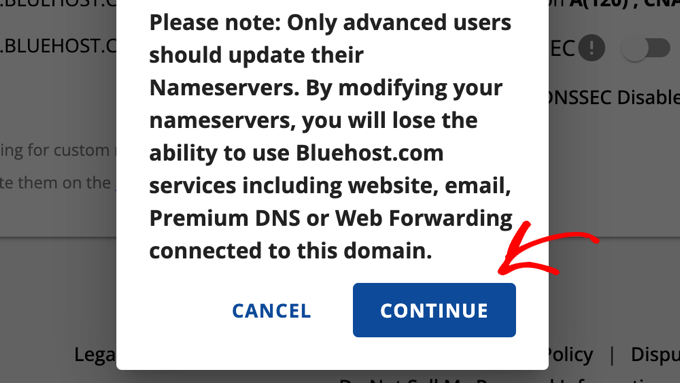
A warning will pop up stating that only advanced users should update their nameservers.
Simply click the ‘Continue’ button to acknowledge the message and move on.
Now, you can carefully enter the settings for Nameserver 1 and Nameserver 2 that Cloudflare provided above.
Once you have done that, click the ‘Save’ button to store the new settings.
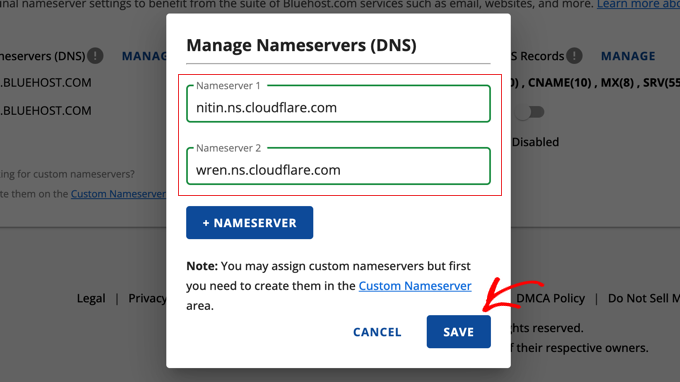
Note: Changing nameservers can take some time to propagate throughout the internet. During this time, your website may become inaccessible to some users.
Now that you have updated your nameservers, you can go back to the Cloudflare setup page.
Once there, you can finish the setup by clicking the blue button labeled ‘Done, check nameservers’.
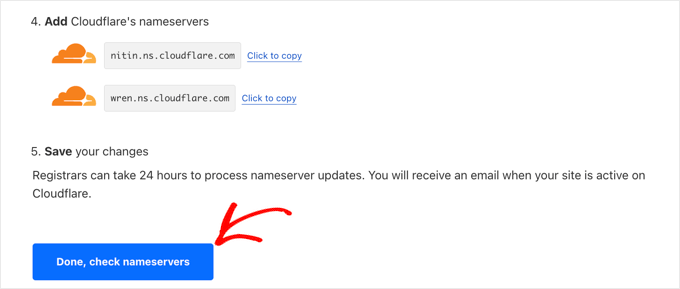
You will need to wait for a few minutes for your nameservers to be checked, and Cloudflare to be activated.
After it is activated, you will see the success message in your Cloudflare dashboard.

Configuring Cloudflare
You will want to configure Cloudflare to improve your website performance. Luckily, the Quick Start Guide will open automatically and take you through the settings.
To learn more, please follow our tutorial on how to set up Cloudflare Free CDN in WordPress.
Use WPBeginner’s Site Speed Optimization Professional Service
If you don’t have the time or expertise to offload your media files and improve the performance of your WordPress website, then you can get our experts to do it for you.
Over the years, we have helped over 100,000 people get started with WordPress. Why not hire us to boost your website speed and performance?
Before we even touch your site, we’ll create a comprehensive site speed and website performance report to measure your page loading time, server performance, and technical SEO aspects. This will help us identify what can be improved.
Our standard service starts at $699 and includes CDN setup, image compression, caching configuration, and much more.
Just take a look at our Site Speed Optimization Service page for further details and to book a free consultation.
Bonus: Optimize Your Images Before Offloading for Better Performance
Before offloading your media files, you will want to make sure you optimize and compress them to gain further speed improvements.
You can use plugins like WP Smush and others to optimize WordPress images by reducing their size without losing quality. This will minimize the amount of data that needs to be offloaded.
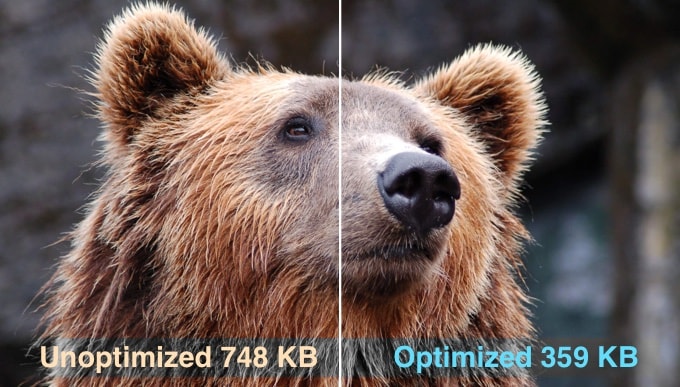
An optimized image can be up to 80% smaller than the original without any loss in quality. In the example above, the image is 52% smaller.
For detailed instructions, see our guide on how to optimize images for web performance without losing quality.
Frequently Asked Questions About Offloading WordPress Media
Here are some quick answers to the most common questions about offloading WordPress media.
What exactly does it mean to “offload” WordPress media?
Offloading your media library means storing your images, videos, and other media files on a separate server, like a cloud storage service, instead of on your website’s main hosting server.
Why should I offload my WordPress media?
Offloading reduces the load on your web server, leading to faster page load times, improved website performance, and a better user experience. It can also boost your site’s scalability and reduce hosting costs.
What are the most common ways to offload media?
The most popular methods include using cloud storage services like Amazon S3 or Google Cloud Storage and using a Content Delivery Network (CDN).
What’s the difference between cloud storage and a CDN for media offloading?
Cloud storage moves your media files to a different server. On the other hand, a CDN creates copies of your media files on multiple servers worldwide to deliver them faster to users based on their location. You can often combine these solutions for the best of both worlds.
Do I need technical skills to offload my media?
While some technical knowledge can be helpful, many plugins simplify the process, making it easy for users of all skill levels to offload their media.
Will offloading break my existing image links?
If done correctly, offloading should not break your image links. Some plugins will automatically rewrite the image URLs so they continue to display properly. Other plugins only offload newly uploaded images and don’t affect your existing images at all.
What about large video files? Should I offload those too?
For large video files, it’s generally recommended to use a video streaming platform like YouTube or Vimeo and embed the videos on your website instead of offloading them directly.
Will offloading improve my website’s SEO?
Yes, offloading can indirectly improve SEO by increasing website speed, which is a ranking factor for search engines like Google.
Is offloading the only thing I need to do to speed up my website?
Offloading is an important optimization strategy, but it’s most effective when combined with other performance improvements, like WordPress caching and choosing a fast web host.
We hope this tutorial helped you learn how to offload WordPress media to improve website speed. You may also want to see our guide on how to properly run a website speed test or our expert pick of the best WordPress caching plugins to speed up your website.
If you liked this article, then please subscribe to our YouTube Channel for WordPress video tutorials. You can also find us on Twitter and Facebook.

